Friday, July 25, 2014

Color blending

Once you have wool in the colors you want, then you have a vast array of choices when it comes to blending it.

If you want, you can actually just spin the wool white and dye it after.  You can do it a solid color or make stripes by handpainting it.  This produces fine results, but it seems to spoil some of the point of spinning it myself -- that is, the much wider variety of color effects you can do when you're spinning, and also the sheer joy of watching pretty-colored yarn wind onto your spindle.

The next simplest thing is to make a roving or rolag and handpaint that.  That is to say, that's what a lot of people seem to be doing.  You can spin it all as it comes in the roving, or you can split the roving lengthwise and use a piece for each ply so that the color shifts in the different plies match up.  Or you can split it some other way and deliberately have the color shifts not match up.  If all the colors go together well, it's actually a neat effect -- like one set of stripes overlaying another set of stripes.  Where your two plies are different colors, the colors seem to blend, producing a heathery orange effect even though you know you are seeing red and yellow.

Because I like to start from the very beginning, what I wanted to do was to dye the wool in different batches and then blend it myself as I was processing it.  There's a lot of ways to do this too.  People who have a blending hackle can put all the different colors on there and then pull it off with a diz into a nice little roving -- like a handpainted roving, except that the different colors will shift into one another a bit more gradually, and you have more control.  I don't have that kind of equipment though, just handcards.

I discovered, while trying to make a blue and green yarn and winding up with turquoise, that if you take two colors and card them together, you can mix them together completely.  Sure, if you get close, you can see the hairs are different colors, but from even a foot away, it looks like a complete blend, as if you'd blended paint.


Why would you do this instead of just dyeing the wool the color you wanted?  Well, some people like the greater depth of color in blended wool.  Another factor is that dyeing can be iffy business, especially if you're using natural dye, and it's nice to know that the not-quite-right yellow you accidentally got can be mixed with some blue and give you a nice green.

I found that if I wanted clearly visible variegation, I could only card once or twice.  So it worked best to card the different colors separately until they were smooth and even, and then blend them together on the carder into striped rolags.


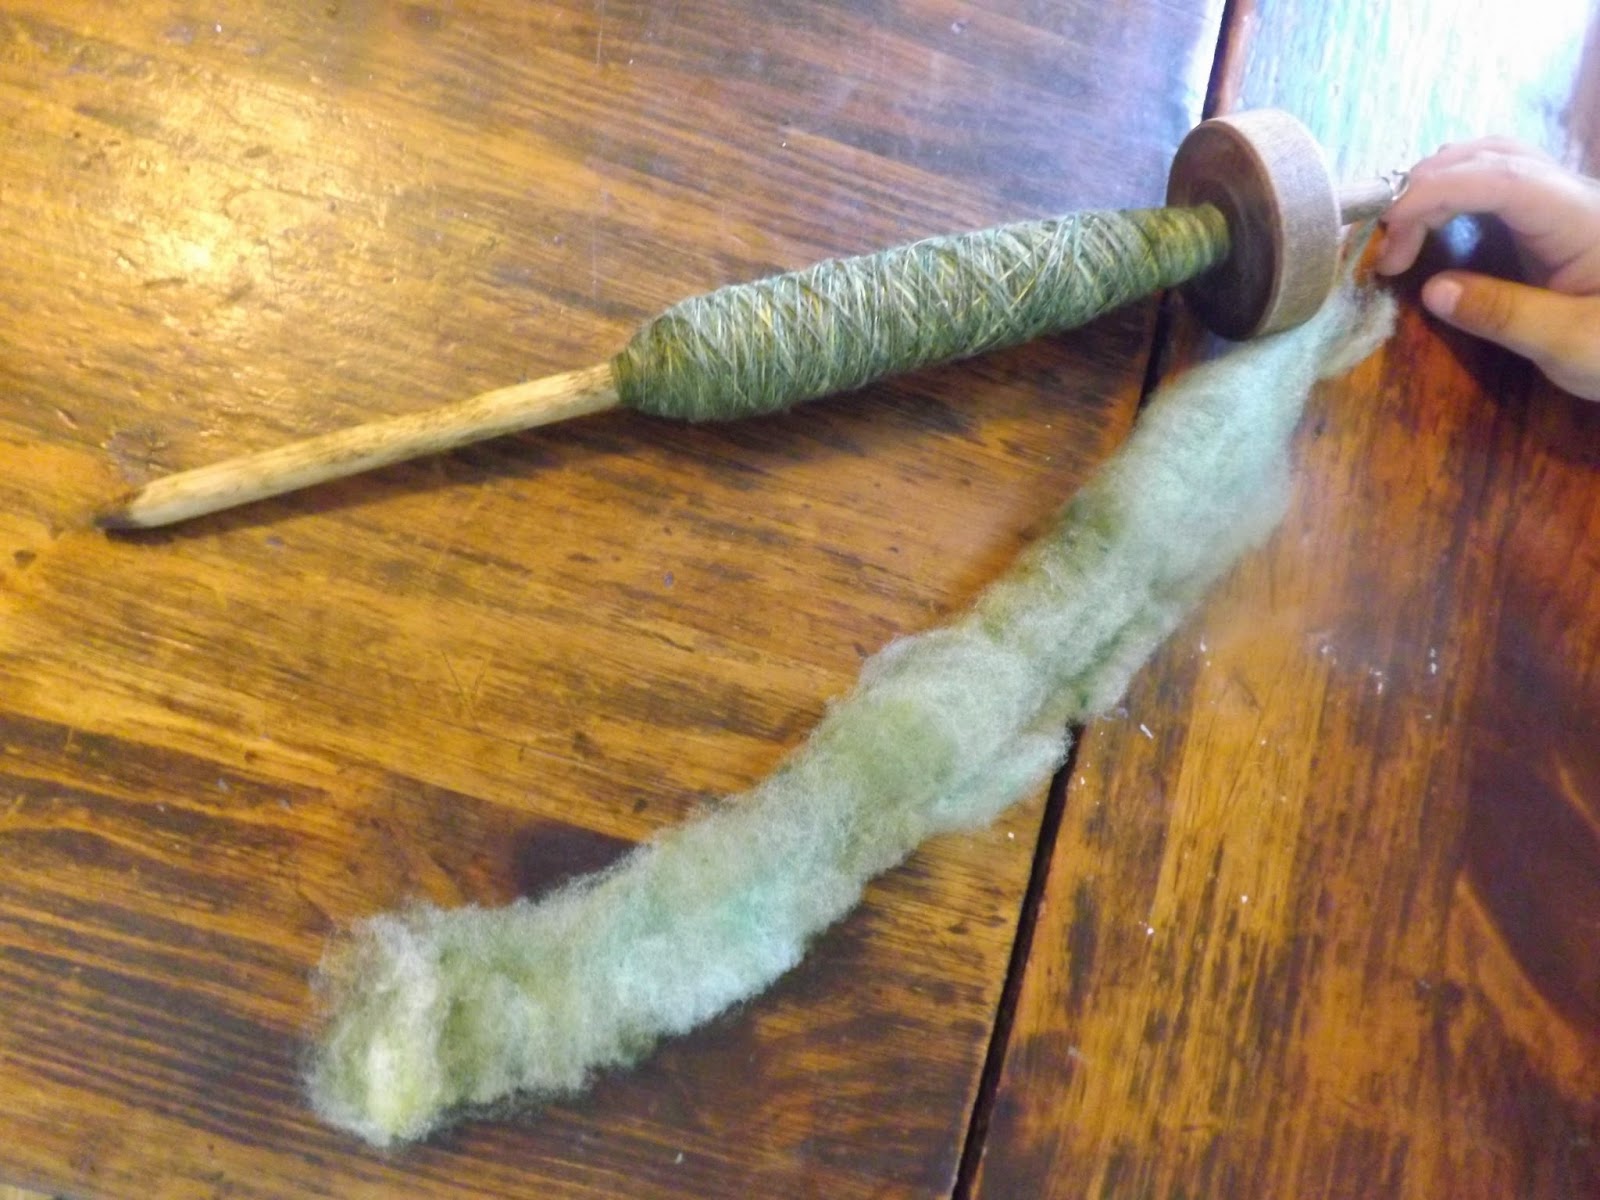
Kind of hard to tell in the picture, but this is the brown, green, and yellow wool from last post.  Each rolag has visible bands of the different colors, and those show up in the yarn.  If I were making a chunky yarn, I'd probably have a couple of feet (translating into a small group of stitches, if you knitted it) of each color.  Since the yarn is very thin, each band of color gives me several yards.

Then, of course, I'm going to ply it.  Since the rolags are pretty random and don't match each other, the plies won't match up.  (I could make them match by Navajo plying, which is a neat little technique that lets you keep the color changes together.)  So the resulting yarn, when it's knitted up into socks, will look heathered, but with changes from row to row -- a row or part of a row that's yellow and green, and then a bit that's green and brown.

This yarn, which is Icelandic dyed with red, orange, and yellow food coloring, is another example.  This one, I experimented a lot with blending methods, but overall the color changes are much longer than the green yarn.  There are 10-30 yards of one color at a time in each ply.  The result will be much bigger stripes and blocks of color -- but still heathered within each stripe, because the three plies of the yarn don't match up.  So there might be an inch in the finished item that's red and yellow, and then an inch that's orange and yellow, giving an impression of a lighter orange.  However, it's deliberately pretty random, so there won't be consistent stripes.


In this yarn, I thought that the green I started with was too bright, so I blended in some llama fiber.  That dark forest green?  That is bright green plus brown, very thoroughly blended.  I made a whole new color, and though you can tell it's not a completely solid color, it doesn't look like bright green and brown anymore.


Here, I blended green and blue in a gradient -- first, just green, then green with a little blue blended in, then a lot of blue, and finally all blue.  The rolags aren't so throroughly carded as to make one color; there were chunks of blue and of green in the rolag and you can see them in the yarn.  Since I didn't want a heathered effect with the different plies, I Navajo plied the yarn.


Color blending is a little intimidating.  It's hard to get the results you want in the roving, rolag, or batt; then it's hard to imagine what the yarn you get might look like.  At every stage you have control and can do a number of different things with the same materials, but it requires a good bit of imagination to picture what might give you the results you want.  All I can say is, it's been nice making a wild guess and seeing what I end up with.  The more I do it, the more clearly I can predict what it might take to get a certain kind of finished project.

Fun with dyeing


Part of the fun of spinning is picking the color combos.  Some people get this joy just by browsing colored rovings on Etsy and buying the colorways they want.  For me, addicted as I am to doing every part of any craft I do, that's not good enough.  I want to select the actual colors I imagine and do the dyeing myself.

The trouble is that of the three kinds of dye -- food coloring, plant dye, and chemical dye -- nothing quite suits.  Chemicals don't suit my aesthetic, which prefers the natural and safe.  They also have to be specially purchased, and I am always on a budget.  Food coloring at least is safe, so I don't need to use special separate pots to do it in, but it takes a lot to get a deep color.  I always wind up with pastels, and even if you use a ton, you usually get bright candy colors.  Sometimes I like that, but sometimes I want deep rich colors, and that's hard to get with food coloring.

But natural dyeing is a whole different ball of yarn.  Each dyestuff you might want to use has its own rules.  Indigo dyeing is completely different from safflower dyeing which is completely different from lichen dyeing.  Some colors, like blue, are notoriously hard to get, and most everything you can find will give you shades of yellow or brown.  Bright colors of any kind are very hard to manage.  The really nice natural dyes -- indigo, cochineal, logwood, fustic -- are almost certainly not available growing wild near you.  You have to order them online, and they're pricey.

Here, for instance, is my experiment with black beans.  Black beans are readily available, which is a big plus, and they make blue shades, which is even better.  But because the color is destroyed by heat, you have to do all the dyeing completely cold.  That seems to result in the dye not taking as well as it otherwise would, and a lot of people report it fades in the sun.  (Superwash yarn seems to take the dye best, but I don't have that.)

So this blue-gray was the best I got, from four ounces of wool and two pounds of beans:


But it occurred to me lately that I could compromise by combining natural dye, those ones I could easily get, with food coloring.  That way I could get some depth and murkiness from the natural dye and add on some bright, clear color with the food coloring.

So far I've only tried this approach once, for a colorway I've been dreaming of which is inspired by the colors of the forest floor.  Forest green, olive green, brown, and a little yellow for the sunshine.

I did two different kinds of wool in this colorway -- unprocessed Rambouillet (this stuff is CRAZY soft, I may never use anything else, even if it is very greasy and hard to clean) and Icelandic roving.  First, I dyed one batch with black walnuts.  This is very simple -- first you boil the black walnuts in water, then you strain them out and simmer the wool in the water.  Simmering unspun wool is risky business because you can felt it if you're not careful, but by not touching or agitating it at all until it was cool, I didn't have any felting.

It wasn't as deep brown as I had hoped -- even an equal weight of black walnuts and wool apparently is not enough for a really dark brown -- but it looked pretty nice.  For the next batch, I used the same black walnut dyebath and added half a container of instant coffee.  This made a slightly redder brown than the first brown, but the difference wasn't very noticeable.

Then I took the two batches of brown wool, plus some white wool, and overdyed it all with food coloring -- a mix of green and a bit of red and yellow to make a somewhat olivey green.  This produced different shades of green and browny-green on each batch.  Last of all I did a little yellow, just in food coloring.

This is how it turned out on the Icelandic, which, because it was cleaner and already carded, took the color pretty evenly.


And this is how it turned out on the Rambouillet.  Like always happens with raw wool, for whatever reason, the tips took the color much more deeply than the rest, but this difference disappears when you card it.  A little lingering grease (despite so many washings!) also kept the dye from taking quite as well as it should have.


Next time I'll talk about how I blended and spun this gorgeous stuff.

Pulling out (my) hair: lots of llama

I had a little phase awhile back where I was completely out of anything spinnable.  Once you've gotten addicted to spinning, that's a terrible place to be.  You read spinning blogs and start eyeing the dryer lint.

But a friend of mine helped me out of this rut by giving me about three pounds of llama fiber.  Three pounds!  It was from three different animals -- one white with fawn bits, one light brown, and one chocolatey dark brown.

Llama is very easy to wash, unlike wool, because it has no lanolin.  So a swish or two in soapy warm water is fine -- no need to make it particularly hot and risk felting it, the way you do with wool.  But -- I discovered by trying it -- washing is actually not the first step.

Before washing, if possible, is when you should de-hair the llama.  Yes, llama has two coats -- a soft, spinnable undercoat, and an outer coat of coarse guard hairs which absolutely will not blend in with the undercoat and have to be removed.  There is no cool doodad for this that I know of -- you basically just have to pick it out by hand.  Some people use cards or combs, but it doesn't really speed up the process so far as I can see.

The good news is, it's not terribly difficult to do, if the lock structure is intact (i.e., you haven't tried washing it or otherwise messing with it too much) and it's a basically good batch.  The light brown was in this condition, so I just turned on a good bright light, grabbed the long hairs sticking out of the end of each lock, and yanked them out.  It helped that on this animal, the guard hairs were noticeably darker in color than the rest as well as being longer and more wiry.  Once the guard hair was out, the fiber changed from "hm, kinda scratchy" to "I want to snuggle with this all night" soft.

The staple length was quite short (like two inches tops) so it was a bit fiddly to spin.  Of course I made it harder on myself by spinning worsted (which is easier with longer fibers, I think) and going for laceweight.  It took forever, but hey -- I had no other fiber and a desperate need to be spinning, so it worked.

When I finished that, I wanted to do the chocolate brown, chunky and woolen this time -- only to hit an awful snag.  Either because of bad handling previously, or because the animal itself didn't have as nice a coat, it was basically impossible to dehair.  The hairs were completely blended into the rest of the fiber and virtually indistinguishable.  Then, even when I thought I'd gotten them all, they'd appear while I was spinning, refusing to lie flat and prickling out.  So much for my dream of soft fluffy yarn -- it wound up scratchy as heck.

Lesson learned: llama is more work than wool, because of the dehairing; it can be wonderfully soft; and sometimes you just get a bad batch and there's not much you can do about it.


Anyway, I made a hat out of it.  It wasn't soft enough to be a scarf, I thought, and it was rather hairy, but it was still a lovely color and made a good hat.

The white looks to be in good shape, so I think I've got a plan for it -- a shawl.  Since llama is not at all stretchy -- no good for socks, for instance, not by itself -- it works well in weaving.  I'd like to do a big rectangular shawl that shades between the white and the fawn colors of that fiber.  But I'll have to wait till I have a bigger loom, because I want a BIG shawl, something I can wear to nice occasions over a sleeveless dress.